Google

Friday, June 14, 2024

Back Up iPhone 13 Pro to MacBook Air

A Finder window showing the Back Up Now button 

REMARK: For macOS 10.15 or later, use Finder to backup
                   For macOS earlier than 10.15, use iTunes to backup

1. Connect iPhone 13 Pro and MacBook Air using USB-C to Lightning Cable.

2. On iPhone:
    . Trust This Computer? > Trust
    . Enter Passcode > [passcode]

3. On MacBook Air:
    'Software Update: A software update is required to connect to [iPhone_name] iPhone'. > Install

4. Installing 1 item

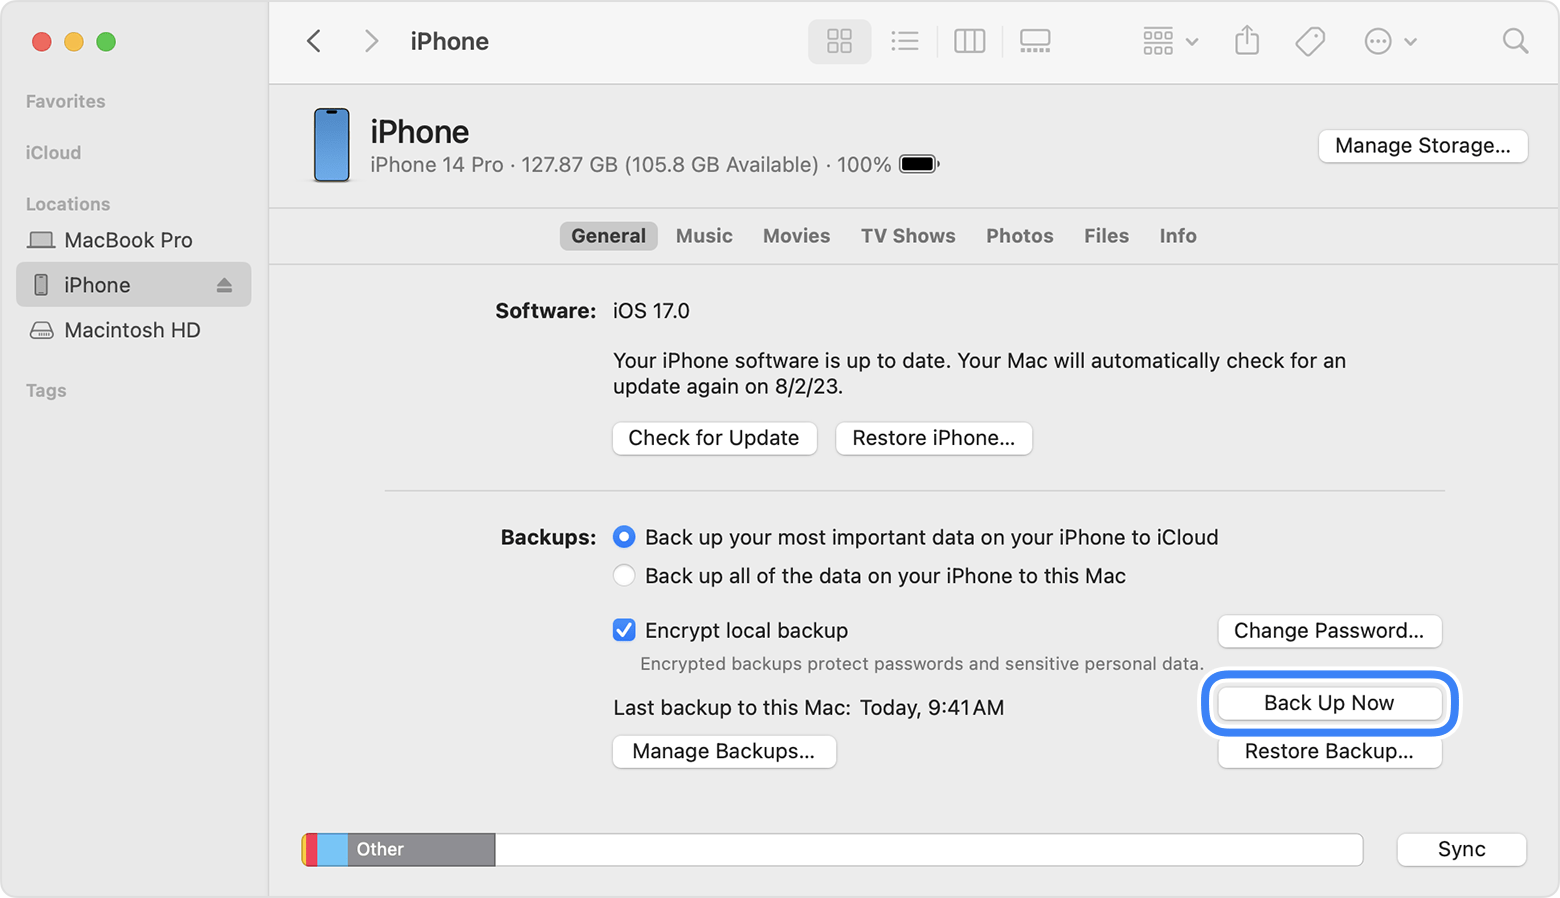
5. Finder sidebar > Click [iPhone_name]

6. On right hand side, click General tab
   . Select 'Back up all of the data on your iPhone to this Mac' > Back Up Now

7. When Back Up completed:
    Last backup on this Mac: Today, [h:mm AM/PM]

8. Under 'General' tab, click 'Manage Backups' to view all Back Up.

URL: https://support.apple.com/en-my/guide/iphone/iph3ecf67d29/ios

Sunday, December 17, 2023

iPad Air 64GB (4th Generation) Wi-Fi: Pair with Apple Pencil (2nd generation)


PRE-PAIRING:
@ Update iPadOS to the latest
@ Apple Pencil compatible with iPad Air
@ Apple Pencil charged, with battery 50% or more
 

1. Attach Apple Pencil on right hand side of iPad  magnetic connector

2. Welcome to Apple Pencil > Continue

3. Try Scribble > Continue

4. Explore Double Tap > Done

URL: https://support.apple.com/en-my/HT205236

Charging Apple Pencil (2nd generation)

1. Attach Apple Pencil on right hand side of iPad  magnetic connector

2. Swipe left on iPad  Home Screen

3. Look for Apple Pencil icon for current battery level


Saturday, December 16, 2023

iPad Air 64GB (4th Generation) Wi-Fi: Software Update


1. Settings > General > Software Update

2. Software Update:
    iPadOS 17.2
    Download and Install

3. Enter Passcode:
    Enter your passcode: [passcode]

4. Terms and Conditions: Agree

5. About xx minutes remaining > Preparing Update...

6. Software Update: Install Now

7. Verifying update...

8. iPad will be reboot for update to complete

9. Swipe up to open

10. Enter Passcode: [passcode]

11. Software Update Complete: Your iPad has been updated to iPadOS 17.2 > Continue

12. Apple Pay: Set Up Later

13. iPad Analytics: Don't Share

14. Welcome to iPad > Get Started

15. Settings > Finish Setting Up Your iPad > Set Up Apple Pay

16. Apple Pay: Set Up Later

URL: https://www.apple.com/my/ipados/ipados-17/

iPad Air 64GB (4th Generation) Wi-Fi: First Time Setup


1. Press and hold the upper right button. Release when Apple logo appear.

2. Swipe up to open

3. English

4. Select Your Country or Region: [Country]

5. Quick Start: Set Up Manually

6. Written and Spoken Languages > Continue

7. Choose a Wi-Fi Network: [ap_name]

8. Enter Password:
    Password: [password]
    Join
    Next

9. Data & Privacy: Continue

10. Touch ID: Set Up Touch ID Later
      Are you sure you don't want to use Touch ID?: Don't Use

11. Create a Passcode:
      Passcode: [passcode]
      Re-enter your passcode: [passcode]

12. Apps & Data: Don't Transfer Apps & Data

13. Apple ID:
      Apple ID: [Email]
      Next

14. Password: [apple_id_password]
      Next

15. Apple ID Security: Continue

16. Verification Code: [6_digit_code]

17. Terms and Conditions: Agree

18. Make This Your New iPad: Continue

19. Apple Pay: Set Up Later in Settings

20. Siri: Set Up Later in Settings

21. Welcome to iPad: Get Started

22. Settings > Finish Setting Up Your iPad > Finish Setting Up

23. Enter Passcode
      Enter your passcode: [passcode]

24. Touch ID: Set Up Touch ID Later
      Are you sure you don't want to use Touch ID?: Don't Use

25. Apple Pay: Set Up Later in Settings

26. Siri: Set Up Later in Settings